


Dolly Donations Rag Dolly Tutorial – Free Pattern
Thursday, January 28, 2010

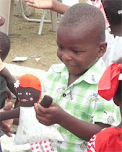
I made this very Quick & Easy Free Doll Sewing Pattern to use as much scrap material as possible whilst providing a fun Dolly for a child in need. I have no qualms about you using this pattern for your own kiddy winks, but I really would appreciate it if you would consider making one for a child in need also. For more info, please check my FAQ page. Thanks & Happy Sewing!
My other doll patterns can be found at my: Instant Download Shop ♥
This Dolly is a huggable 16 inches when finished :)
Click to Download PDF Pattern
Materials
Paper/card for pattern
Scissors
Pins
Thread
Sewing machine (or by hand!)
Poly-fill (or other stuffing material you use!)
Scrap fabric
Brown fabric for face (arms and legs if you wish too!)
Felt (or fleece) for the hair
Water color pencils, pen or chalk
(You can Click on the photos to enlarge them)

(1) Down load the PDF and print out the pattern. Please note a ¼ inch sewing/cut seem has already been added!
(2) I then transferred it onto card (old pasta boxes etc) as I knew I was going to be using it a lot!!! Just glue the print out directly onto the card and cut around it.
(3) Take a piece of prewashed ironed fabric and draw around your template. I love using water color pencils. If you make a mistake it washes right off in seconds. If you are using patterned fabric, always mark on the WRONG side.

Cut out the pieces: 1 head in brown fabric, 1 head in felt, 1 hair in felt, 4 arms, 4 legs, 1 body and (4) pin the arms and legs together.
(5)Sew the felt hair onto the face/ head, and then (6) pin it (RIGHT way to RIGHT way) to the body. Pin the back felt head to the other body and sew them together (7).


(13) Make a sandwich with the other body part, RIGHT sides facing in, and pin (careful not to pin the ‘hand’ on the opposite side of the body as you’ll send up sewing over it!!!).
(14) Sew around the edges, taking care around where the arms are and the neck (it can be a bit fiddly at first! But by Dolly number 3 you’ll be a pro!).


(18 - 19) Now for the bottom of the dress (or shirt if it's a boy). Pinch in the corners and tuck approximately 1/4 inch fabric inside and pin to create a seam.

(20) For the girl Dolly leave the center open and pin in the legs next to each other. For the Boy Dolly, pin the legs at each end. (21) Then sew straight across, tie off and use a needle to hide the threads inside seam or the body.

Ta da!!!! You Have Made Your First Dolly!!!
Ok, now for the embellishments! If it’s a girl Dolly add a bow or a flower to her hair if you like. Use fabric paint, or acrylic artist paint for a face. Felt work well for eyes, and you can’t go wrong with embroidery thread. :)
Please check out the Tutorials for:
Faces
Felt Face Ideas
 Hair
Hair
Why not add some cute hair styles!
Accessories
How to Make Boy Doll Shorts
How to make Doll Shoes
How to Make a Hair Bow

Why not add some cute hair styles!
Accessories
How to Make Boy Doll Shorts
How to make Doll Shoes
How to Make a Hair Bow
Please send me your Dolly photos, or join the Dolly Donations Flickr Group and share them with everyone!
Have a Question? Please check my FAQ page., leave a comment and/or Click to Email Me